
Your iMasterWeb website is live. Now you need to know whether Google can find your pages and which searches bring people to them. Google Search Console is the free tool to set up next. This guide takes you from your first sign-in to useful checks and decisions, without assuming any SEO knowledge.
Guide and screenshots checked on 20 October 2026. Menus can change over time.
Your goal: verify your site, submit its sitemap, check essential pages and understand what to do when something fails. Allow around 30 minutes for the setup itself, plus any DNS propagation and data-processing time.
In this guide
- What will Search Console do for your new website?
- Before you start: gather the right access
- 1. Add your website: Domain or URL prefix?
- 2. Verify ownership
- 3. Find and submit your sitemap
- 4. Inspect your home page and essential services
- 5. Understand non-indexed pages before changing anything
- 6. Read your first results and choose an improvement
- Your first-month routine
- Frequently asked questions
What will Search Console do for your new website?
Picture a local tradesperson publishing a home page, services, service area and contact page. Before chasing rankings, the practical question is whether Google can discover those pages. Search Console helps you monitor that presence and investigate obstacles.
- Discovery and indexing: check whether Google knows a page and has included it in its index.
- Visibility: see the queries and pages generating impressions and clicks.
- Diagnostics: investigate an inaccessible page, a missing URL or an unexpected canonical.
Crawling means a robot visits a page; indexing means the search engine includes it in its index. Neither promises a first position or visitors. Search Console does not count every visit or measure sales: those require suitable analytics and conversion tracking.
Before you start: gather the right access
- A Google account you intend to keep for your business.
- Your final site address, for example
https://www.example.com/. Replaceexample.comwith your own domain throughout this guide. - Access to your domain’s DNS management, or your WordPress dashboard for the alternative method.
- Your sitemap address, which you will locate in step 3.
Open your site while signed out of WordPress. It should be public and work over HTTPS. A password-protected staging site or a coming-soon page is not your finished public website. If iMasterWeb handles the technical setup, ask where your DNS and sitemap are managed: the location depends on your configuration.
1. Add your website: Domain or URL prefix?
- Open Google Search Console and sign in.
- If a property is already open, use the selector at the top left and choose Add property.
- If you see a choice of online presence types, select Add a website.
- Choose one of the following property types.
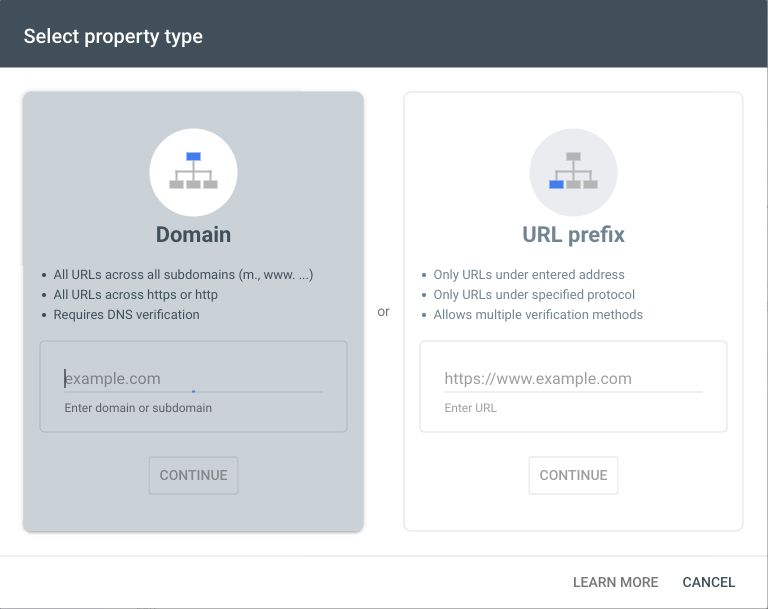
Domain: enter example.com, without https or a page path. It groups protocols and subdomains. URL prefix: enter the complete address, such as https://www.example.com/. It covers only that prefix: www and non-www, or HTTP and HTTPS, are different. Google’s property comparison.
2. Verify ownership
Recommended when you have DNS access
- After choosing Domain, copy the TXT value supplied by Google.
- Open the authoritative DNS zone for your domain; this may differ from the company that sold you the domain.
- Add a TXT record at the root. Depending on the DNS manager, Name/Host may require
@or a blank value: follow its instructions. Paste Google’s value into Content/Value and keep the default TTL. - Save the record, return to Search Console and click Verify.
Add the record without replacing existing website or email records. If Google cannot find it immediately, allow propagation time and try later; this can take up to a few days. Keep the verification proof in place afterwards. Google’s verification troubleshooting.
WordPress alternative: an HTML tag
Choose a URL-prefix property and the HTML tag method. If your site already uses Rank Math, open Rank Math SEO → General Settings → Webmaster Tools. Paste the verification code into the Google Search Console field, save, clear the site cache and return to click Verify. Rank Math’s instructions.
With another SEO tool, use its Google verification field. Do not install a second SEO plugin just for this, or paste the tag into an article: it belongs in the site’s HTML head. If you lack suitable access, send iMasterWeb support the chosen method and code, not your Google password.
Success check: the property is verified and you can open its reports. Keep control of the account; use Search Console’s access permissions when someone needs to help.
3. Find and submit your sitemap
An XML sitemap is a technical list of URLs that helps Google discover content. It is not your navigation menu or a promise that every page will be indexed.
- Find the sitemap URL shown by your CMS or SEO tool. In Rank Math, look under Sitemap Settings.
- Open it in a browser. It should display XML or a list of sitemaps without requiring a login.
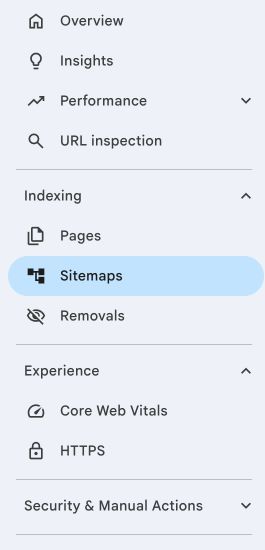
- In Search Console, open Indexing → Sitemaps.
- Enter the sitemap and click Submit. If the domain is already displayed before the field, enter only the path, such as
sitemap_index.xml.

/sitemap_index.xml is common with an SEO plugin; /wp-sitemap.xml is another WordPress possibility. These are examples, not a guarantee for your setup. A sitemap index groups several files and is usually a sufficient starting point.
Success check: the sitemap appears and reaches Success after processing. For “Couldn’t fetch”, check the exact address, public access and server restrictions. Discovered URLs and indexed pages are different counts. Sitemap statuses explained.
4. Inspect your home page and essential services
- Copy a page’s final URL.
- Paste it into the inspection bar at the top of Search Console.
- Read its status and expand the indexing details.
- If the page has changed since Google last visited, select Test live URL.
- For a useful public page that is technically accessible, you may select Request indexing.
Start with your home page and main services. The initial result describes Google’s known version; the live test checks the current page without guaranteeing indexing. A request does not force a ranking or a deadline. Repeating it daily is unnecessary. URL Inspection help.
5. Understand non-indexed pages before changing anything
Open Indexing → Pages, then a reason to see examples. Focus on pages customers should find, rather than trying to make every exclusion disappear.
- Excluded by noindex: expected for deliberately excluded content; investigate if it affects a public service page. Check page settings and WordPress’s search-engine visibility setting.
- Page with redirect: often normal for an old URL. Check the destination and link directly to it from your site.
- Alternate page with proper canonical tag: may be expected for a variant. A canonical is the reference URL for similar content.
- Not found, 404: fix a broken link, restore a needed page or redirect to a genuine replacement. Removed content without an equivalent can remain a 404.
- Crawled or discovered, currently not indexed: check access, distinct useful content and internal links. Another submission is not an automatic fix.
Confirm the diagnosis before making broad changes to robots.txt, noindex or canonical settings: they serve different purposes. Page indexing reasons.
6. Read your first results and choose an improvement
Once data is available, open Performance or the Search results report. Select a period and review Queries and Pages. Apply a page filter to understand which searches it answers.
- Impressions: times a result was displayed according to the report’s rules.
- Clicks: clicks from the search results covered by the report, not all visits.
- CTR: clicks divided by impressions. Fictional example: 20 clicks from 1,000 impressions is 2%.
- Average position: an average across searches, countries and devices, not a fixed ranking.
Fictional example: your bathroom renovation page appears for relevant searches but attracts few clicks. First examine its position and the searcher’s need. Then, if appropriate, clarify the title, service area and page content. A low CTR alone does not prove the description is poor, and Google can change the displayed title or snippet. Reading Google performance data.
Your first-month routine
- At launch: verify the property, submit the sitemap and inspect your home page and main services.
- The following week: check messages and obstacles affecting essential pages.
- Weekly: review queries and pages; record one observation and one action to test.
- After a month: compare equal-length periods if enough data exists. Avoid drawing conclusions from a handful of clicks.
Data can take several days to appear, and some queries are withheld for privacy. A correctly configured new site may still have little visibility. Keep creating useful pages and linking to them clearly.
Frequently asked questions
Do I need Google Analytics?
No. DNS or HTML-tag verification can work without Analytics. The two tools answer different questions.
Why are there no Core Web Vitals data?
A new or low-traffic site may lack field data. This does not prove it is fast or slow. Use PageSpeed Insights for an additional page-level diagnostic. Current metrics are LCP, INP and CLS; INP replaced FID. Google’s explanation.
What should I send iMasterWeb if I get stuck?
The affected URL, exact message, test date and a focused screenshot. Mention whether you have DNS or WordPress access. Ask iMasterWeb for help.
What about Bing?
Follow our Bing Webmaster Tools setup guide. You can import your verified Search Console site and monitor Bing separately.